
Root email notifications with postfix
Now that Ubuntu 18.04 is out and stable, we are busy building servers to the latest and greatest. One of the most important parts of new servers builds is root notifications. This is a common way for the server to contact you if anything goes wrong. Postfix is a popular piece of email software, alternatively you can use exim or sendmail. I will be guiding you through a Postfix install on an Ubuntu 18.04 server.
“I wanna scream and shout and let it all out”.
– will.i.am & Britney Spears
Postfix set up
Install the postfix email software:
sudo apt-get install postfix mailutils
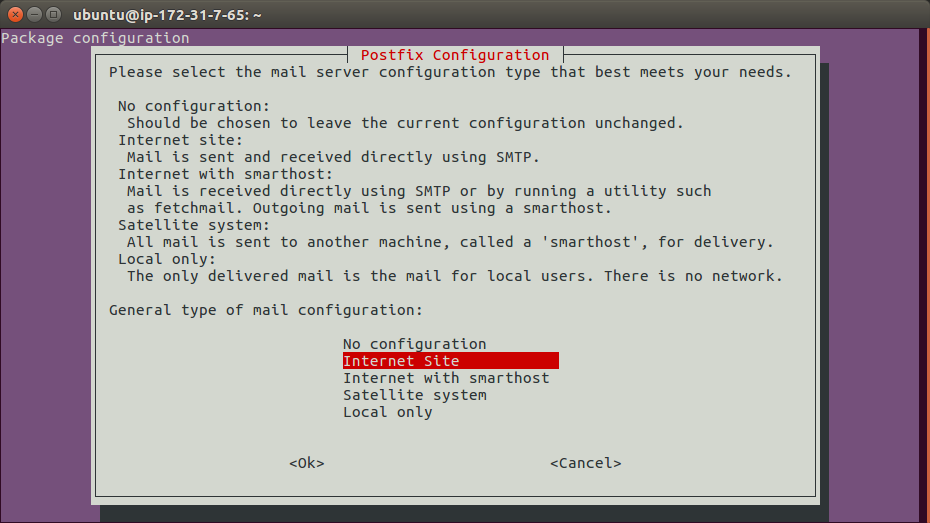
The following screen will pop up. I am setting up a Internet site where email is sent directly using SMTP.
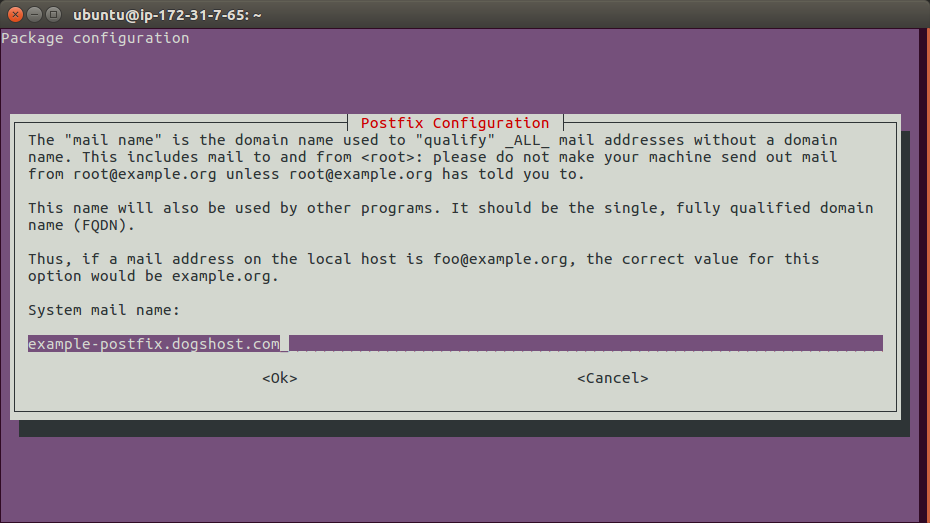
Next enter the server hostname.
If you want to change these settings after the initial install you can with sudo dpkg-reconfigure postfix. There are a number of other prompts for different settings, but I have found the default values are all sensible out of the box.
Now to configure where email notifications are sent to:
sudo vim /etc/aliases
In this file you should already have the “postmaster” alias set to root. This means that any emails to postmaster are sent on to the root user, making it even more important root emails are seen.
It is good practice to set up a few other common aliases. “admin” and your admin username (In my case this was “ubuntu”).
Finally we need to send root email somewhere. Your file should end up looking like this…
postmaster: root
admin: root
ubuntu: root
root: replaceme@example.com
Obviously “replaceme@example.com” should be an email address you have access to and check regularly.
These new aliases need to be loaded into the hashed alias database (/etc/aliases.db) with the following command:
sudo newaliases
Finally send an email to the root user (which should be sent onto the email you configured above) testing our setup is working:
echo "Testing my new postfix setup" | mail -s "Test email from `hostname`" root
Sending Problems?
If you have done the above and are still having problems sending email there are two first points of call I would check.
This command shows all queued email that is waiting to be sent out by the server. If an email is stuck it will show up here.
sudo mailq
All postfix actions are logged into /var/log/mail.log. You will want to look specifically at the postfix/smtpd messages as that is the process which is talking out of your server to others.
A useful tip for debugging is to use tail -f to monitor a log file for any updates. Then in another terminal session, try to send another email. You can then watch for the corresponding log entries in the original terminal. This way you can be sure which log entries you need to be focusing on.
tail -f /var/log/mail.log
Another thing to consider is that your server is part of the bigger internet where spam is a serious issue.
Your servers reputation is important in effecting how email is received, there are technologies you can set up to improve reputation.
Some providers have their own anti-spam protection that could be affecting you such as Google Cloud blocking all traffic on port 25, 465 and 587 & AWS throttling port 25.
Now email is working
Make sure your server scripts and crons are set up to send alerts, and not fail silently. With crons there is a variable to manage this for you, just add MAILTO=root at the top of your cron file.
Lastly, don’t fall victim to alert fatigue. It is easy to send all email to root but this will quickly become tiring. You should only get emails if something goes wrong, or if something needs to be actioned. This way, when a new email comes in you know you need to look at it.
Need help setting up email? Struggling with emails failing to send? Want someone else to receive and manage server notifications? Contact us and see how we can help today!


Trackbacks & Pingbacks
[…] You’ve configured email on your server. If not you’ll need to do that first, we’ve got a guide. […]
Leave a Reply
Want to join the discussion?Feel free to contribute!