Tag Archive for: WordPress

Three Easy Ways To Secure Your WordPress Site

Keeping your WordPress software up to date and safe from vulnerabilities is the most important security tip for any WordPress site. And it’s super easy to do.

Below are three simple ways to secure your WordPress site.

1. Use the latest WordPress Version

Whenever WordPress sends out a new update, it means they may have fixed some bugs, added some features, but most importantly they have added some security features and fixes.

Out of date WordPress verion

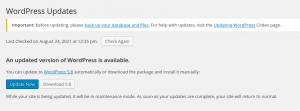
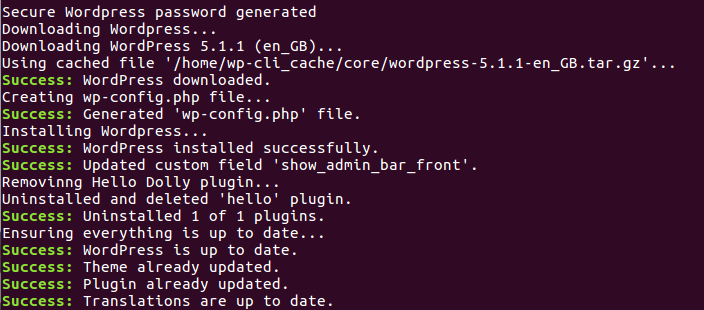
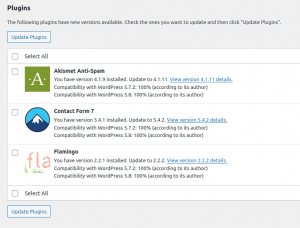
When you see the message above: Update it.

Nowadays, with one-click update, it’s very easy to upgrade your WordPress Version.

Make sure your theme and plugins are compatible with this latest version of WordPress. If an update has been rolled out and it’s not a security update, I suggest you wait for your plugins and themes to become compatible before upgrading.

2. Keep Your WordPress Plugins Updated

As I mentioned above, WordPress releases an update to fix bugs and vulnerabilities, and this is the same for plugins. This is a really quick update to make:

My 3 really simple steps:

  1. Log into your WordPress Site via wp-admin
  2. Click on ‘Plugins’ on the Left hand side
  3. Click the Update Now button for the vulnerable plugin

Many times, an out of date plugin or 3rd party script can create a security hole in your WordPress website causing it to become vulnerable.

In general you should always use plugins which are continually updated and have good support.

If you are using a plugin which has not been updated for a while, find an alternative to it. If you have an installed plugin, remove it.

Vulnerable WordPress Plugins

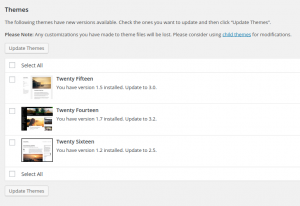
3. Keep Your WordPress Themes Updated

Yes! Even The Themes! Both plugins and themes are built on code. Mostly PHP to be specific. And, that code will eventually be outdated. When a theme (or plugin) is outdated, it’ll still work. Sure. However, it will be more prone to being exploited since it’s an easy way in for attackers.

Make a consistent schedule to regularly check and download the latest updates of themes (and plugins).

These can be found directly on the WordPress dashboard on the “Updates” pages.

For more helpful tips try:

Vulnerable WordPress Themes

But why is this so important?

Hackers created over 65 million new malware in the first quarter of 2019 alone!

Plugins are being updated all the time. For example, on a single day (24 Aug 2021) the following plugin vulnerabilities were all fixed and were ready to be updated:

  • Contact Form Entries < Version 1.2.1 – Reflected Cross-Site Scripting
  • TextME SMS < Version 1.8.9 – Authenticated Stored XSS
  • Live Scores for SportsPress < Version 1.9.1 – Authenticated Local File Inclusion
  • Live Scores for SportsPress < Version 1.9.1 – Reflected Cross-Site Scripting
  • SMTP Mail < Version 1.2 – Reflected Cross-Site Scripting (XSS)
  • SMTP Mail < Version 1.2.2 – Authenticated SQL Injections
  • Contact List < Version 2.9.42 – Reflected Cross-Site Scripting
  • Coupon Affiliates for WooCommerce < Version 4.11.0.2 – Reflected Cross-Site Scripting
  • Podlove Podcast Publisher < Version 3.5.6 – Unauthenticated SQL Injection
  • Recipe Card Blocks < Version 2.8.1 – Reflected Cross-Site Scripting
  • Recipe Card Blocks < Version 2.8.3 – Contributor+ Stored Cross-Site Scripting

As of June 2020 over 73% of the most popular WordPress installations were vulnerable. They were vulnerable to exploitable vulnerabilities that can be detected with free automated tools, within seconds.
It only takes a couple of minutes for a malicious attacker to run an automated tool that can discover these vulnerabilities and exploit them. This highlights the importance choosing the right WordPress web host that auto updates both plugins and WordPress.

The most common vulnerabilities

Arbitrary File Upload & File Viewing: Lack of file type and content filtering allows for upload of arbitrary files that can contain executable code which, once run, can do pretty much anything on a site. Instead of allowing only certain file source to be viewed (for example plugin templates) the lack of checks in the code allows the attacker to view the source of any file, including those with sensitive information such as wp-config.php

Privilege Escalation: Once the attacker has an account on the site, even if it’s only of the subscriber type, he can escalate his privileges to a higher level, including administrative ones.

SQL Injection: By not escaping and filtering data that goes into SQL queries, malicious code can be injected into queries and data deleted, updated or inserted into the database. This is one of the most common vulnerabilities.

Remote Code Execution (RCE): Instead of uploading and running malicious code, the attacker can run it from a remote location. The code can do anything, from hijacking the site to completely deleting it.

How Dogsbody can help

So, you maybe wondering ‘How will I know I’m vulnerable in the first place’.

The easiest way is to log into your WordPress site and take a look.


Feature image by mmayyer licensed Unsplash.

How to set-up fail2ban for a WordPress site

What is Fail2ban

Fail2ban is a tool which you can use to reduce the impact of attacks on your servers. Typically you configure it to monitor a log file for suspicious activity.  Then once the activity crosses a threshold you can have it take an action, such as block the source IP address in your firewall.  It’s a good way to stop attacks early but doesn’t entirely prevent them.

Why use it to protect WordPress

Due to it’s popularity, WordPress is often the target of automated attacks.  We often see bruteforce attacks targeting xmlrpc.php or wp-login.php, these rely on making a huge number of requests in the hope that one will eventually be successful.  Using strong passwords, especially for accounts with admin access is important to reduce the risk from attacks.  Fail2ban can be used to slow attackers down.  This helps for two reasons: it makes them less likely to succeed; it reduces the load on the server caused by processing these requests.

Other options

Blocking an attack as far upstream as possible is always advantageous to save resources so we would typically favour a Web Application Firewall or Webserver configuration over using fail2ban or a WordPress plugin however every site, server and customer is different so it will depend on the exact configuration used and required.

Install & config fail2ban (for Ubuntu)

sudo apt-get install fail2ban

Fail2ban works by having a jail file which references the log file, a filter and an action.  By default fail2ban will protect sshd.  If you are restricting SSH access in another way then you might want to turn this off.  You can do so by creating the following as /etc/fail2ban/jail.local

[sshd]
enabled = false

Fail2ban doesn’t come with a filter for WordPress.  I’d like to credit these two articles for providing a good starting point.  We see requests to ‘//xmlrpc.php’ (note the double slashes) fairly frequently so tweaked the below to also flag them.  As this is detecting any requests to wp-login/xmlrpc it will flag legitimate admin users when they login etc.  We’ll look to account for this with the jail configuration.

You can create the filter as /etc/fail2ban/filter.d/wordpress.conf

[Definition]
failregex = ^<HOST> .* "(GET|POST) /+wp-login.php
            ^<HOST> .* "(GET|POST) /+xmlrpc.php

The jail file has most of the configuration options:

  • logpath, in this case the path to your Apache access log
  • action, adjust this if you’re using a different firewall or want to be sent email instead, you can see available options in /etc/fail2ban/action.d/
  • maxretry, the number of requests within findtime seconds to ban after
  • bantime, the number of seconds to ban for, with this action how long they’re blocked in iptables

As mentioned, the filter will catch both malicious and legitimate users.  We’re configuring maxrety fairly high and bantime relatively low to minimise the probability and impact if we do block a legitimate user.  Whilst this allows attackers to make roughly one request every ten seconds this is a fraction of what they’d make without fail2ban.

You can create the jail file as /etc/fail2ban/jail.d/wordpress.conf

[wordpress]
enabled = true
port = http,https
filter = wordpress
action = iptables-multiport[name=wordpress, port="http,https", protocol=tcp]
logpath = /var/log/apache2/all-sites-access.log
maxretry = 12
findtime = 120
bantime = 120

Restart fail2ban to load in your new config

sudo systemctl restart fail2ban

Checking your fail2ban set-up

Show the jails

sudo fail2ban-client status

Show info about the WordPress jail

sudo fail2ban-client status wordpress

List the f2b-wordpress iptables chain (this will be created the first time fail2ban blocks an IP and contain blocked IPs)

sudo iptables -v -n -L f2b-wordpress
sudo ip6tables -v -n -L f2b-wordpress

View the log to see any IPs banned or flagged

sudo less /var/log/fail2ban.log


Feature image by Jussie D.Brito licensed CC BY-SA 2.0.

WP-CLI – The Swiss Army Knife For WordPress

WP-CLI (WordPress Command-Line Interface) is an open source project providing a command-line interface for managing WordPress sites. It is an extremely powerful and versatile tool, being able to carry out pretty much any operation that would normally be carried out via the web control panel, along with some additional functions that are only available via the CLI.

We use WP-CLI extensively here at Dogsbody Technology. It allows us to streamline and automate our WordPress set up and maintenance routine, so we thought we’d spread the word and get everybody else in on the action.

Installation

There are a few installation methods for WP-CLI, all which are documented here. We typically use the Phar installation method, which is as simple as:

curl -O https://raw.githubusercontent.com/wp-cli/builds/gh-pages/phar/wp-cli.phar
chmod +x wp-cli.phar
sudo mv wp-cli.phar /usr/local/bin/wp

Basic Usage

Unless otherwise instructed, WP-CLI will operate on the site contained in your current working directory. So if you want to work on a particular site you’ll need to “cd” to the installation directory before running your command, or alternatively you can pass the --path argument to WP-CLI. e.g.

wp --path=/var/www/dogsbody.com plugin install yoast

Creating a new site

As well as managing existing sites, WP-CLI can also set up new ones. You’ll need to create a MySQL database and user, but beyond that WP-CLI can handle the rest. A basic site download/install procedure may look something like this:

wp core download --locale=en_GB
wp core config --dbname=database_name --dbuser=database_user --dbpass=database_password
wp core install --url=www.dogsbody.com --title="Dogsbody's Website" --admin_user=dogsbody --admin_password=admin_password --admin_email= --skip-email

Re-Writing a site

We often have customers wanting to take an existing site and re-configuring it to work on a new domain, or wanting to add HTTPS to an existing site and update everything to be served securely. WP-CLI makes this otherwise quite complex process much easier with with it’s search/replace feature:

wp search-replace 'https://www.dogsbodytechnology.com' 'https://www.dogsbody.com' --skip-columns=guid

(It’s advisable to skip the guid column as the guid of posts/pages within WordPress should never change).

In summary, WP-CLI is a very powerful tool and one that anybody working with WordPress sites often should at least be aware of. It can save you heaps of time and help you avoid mistakes.

If you want any help with WP-CLI, then please contact us. Or if you want some seriously fast and secure WordPress hosting, be sure to check out our WordPress hosting.

Alternative Map for WordPress

On 11th June 2018 Google made a massive change to its Google Maps API that has now broken a lot of websites that contain maps. Whilst you can fix this by getting a Google Maps API key and giving them a mandatory credit card to charge you if you go above their free band, a lot of people don’t want to do this and are looking for alternatives.

This guide is how to set up a basic alternative in WordPress which doesn’t require a google account or entering credit card details to use the service.

Please note there are many Map Plugins for WordPress out there –  this is not a recommendation but the easiest one we could find that worked and fitted our criteria. We are not web developers, this article is to help our smaller hosting customers set up new maps on their website(s).

Install instructions

  1. Once logged into your website, install and activate the Plugin Leaflet Map. Once activated it will appear in the left hand menu.
  2. Go to Leaflet Map – Shortcode Helper and use the Map to position your marker pin (marked Drag Me) to your location.
  3. Copy both the Interactive Shortcodes – Map Shortcode and Marker Shortcode
    (I’d advise putting them in a text document so they are accessible as the map resets as soon as you leave the page). Example Shortcode only – DO NOT use these shortcodes
    Map Shortcode
    [leaflet-map lat=51.278722859212216 lng=-0.7769823074340821 zoom=14]
    Marker Shortcode
    [leaflet-marker lat=51.27931344408708 lng=-0.7895135879516603]
  4. These short code can now be entered onto a Page, Post or in a Text widget (Appearance – Widgets) and a map will be active .
  5. You can edit the zoom number as you see fit.
    [leaflet-map lat=51.278722859212216 lng=-0.7769823074340821 zoom=11]

The above will give you a simple map with a marker pin at your location.

Added Features

You can add a number of features. Below we help set up the two we feel are useful.

Adding text to your marker pin

To add text to your marker pin as per the example above you need to edit the code in your Marker Shortcode on your page, post or widget.

Simply insert the text you wish to display to the end of your leaflet-marker code and add [/leaflet-marker] at the end of the text.

Example below:

[leaflet-marker lat=51.27931344408708 lng=-0.7895135879516603]Cody Technology Park
Old Ively Road
Farnborough
GU14 0LX[/leaflet-marker]

Adding zoom buttons to your map

To add zoom buttons you need to edit the code in your Map Shortcode on your page, post or widget.

Previously your Map sortcode looked like this:

[leaflet-map lat=51.278722859212216 lng=-0.7769823074340821 zoom=14]

Below is the code you need to add.

[leaflet-map lat=51.278722859212216 lng=-0.7769823074340821 zoom=14 zoomcontrol=1]

Always set zoom control to 1.

Again you can edit the zoom= number  as you see fit
[leaflet-map lat=51.278722859212216 lng=-0.7769823074340821 zoom=11 zoomcontrol=1]

As with all plugins you need to ensure you keep them updated to the latest version so they do not become a vulnerability to your website.

Hopefully this will help smaller website owners with no web developers to make these changes to their website themselves. If you require help please contact us for a quote.

Adding Google Analytics tracking to WordPress via a plugin

Before we start you will need a Google Analytics account.  See our other guide for setting up a Google Analytics account.

There are many Plugins that add Google Analytics to a WordPress site. Some will add Google Analytics reports into your WordPress site admin interface and other will just push your site’s data to Google Analytics meaning you have to view it on the Google Analytics website.

For this post we are installing Google Analytics Dashboard for WP.  As with any Plugin you need to consider security.  Look for Plugin’s that have had lots of downloads and good reviews and also that have been updated within the last 6 months. Plugin are made by anyone with programming skills and like most things people lose interest or run out of time to keep their made plugin secure and updated.  An insecure plugin could be the way hackers get into your website and cause issues.

To install Google Analytics Dashboard for WordPress:

  1. Log into your WordPress site (www.example.co.uk/wp-admin)
  2. On the left hand side go to Plugins and click Add New.
  3. Search Plugins in the right hand corner of the page for ‘Google Analytics Dashboard for WP‘ and click Install Now.Google Analytics Dashboard for WP
  4. On the install page click Activate Plugin – you will now see Google Analytics on your left hand menu
  5. Select Google Analytics – General Settings and click Authorise Plugin
  6. Click the red link (Get Access Code) on this page to generate and get your access code. A new window will pop-up asking you to allow specific data from your Google Analytics account to be used by Google Analytics Dashboard for WP. After agreement, an access code will be provided.
  7. Copy the code, paste it in the field called Access Code and save it by pressing the Save Access Code button.
  8. Once set up please be aware it may take up to 24 hour for data to appear in your reports.

You are now set to explore and set up Google Analytics Dashboard for WP as you wish. For more information and a more in depth video on how it works please visit the Google Analytics Dashboard for WP Documentation, Tutorials and FAQ page.