
Setting up IPv6 on your EC2
This is the second part of a two part series on setting up IPv6 in Amazon Web Services (AWS). The first part discussed setting up IPv6 in your AWS VPC. This second part will discuss setting up IPv6 on your EC2 instances.
Why there are no new IPv4 jokes? Because it is exhausted!
Seeing as most of you have come from our other blog post we’ll jump straight in…
Step 1: Security Groups
Do one thing and do it well, a great philosophy we follow at Dogsbody Technology. AWS follow it strongly as well splitting their server hosting into many individual services. Security Groups are their firewall service, and since they are based on IP addresses they need updating for IPv6.
- Open the EC2 management console, you can also find this by selecting the services menu at the top left and searching for “EC2”.
- In the navigation bar, under the “Network & Security” tab, Select Security Groups.
- Select a Security Group in your VPC
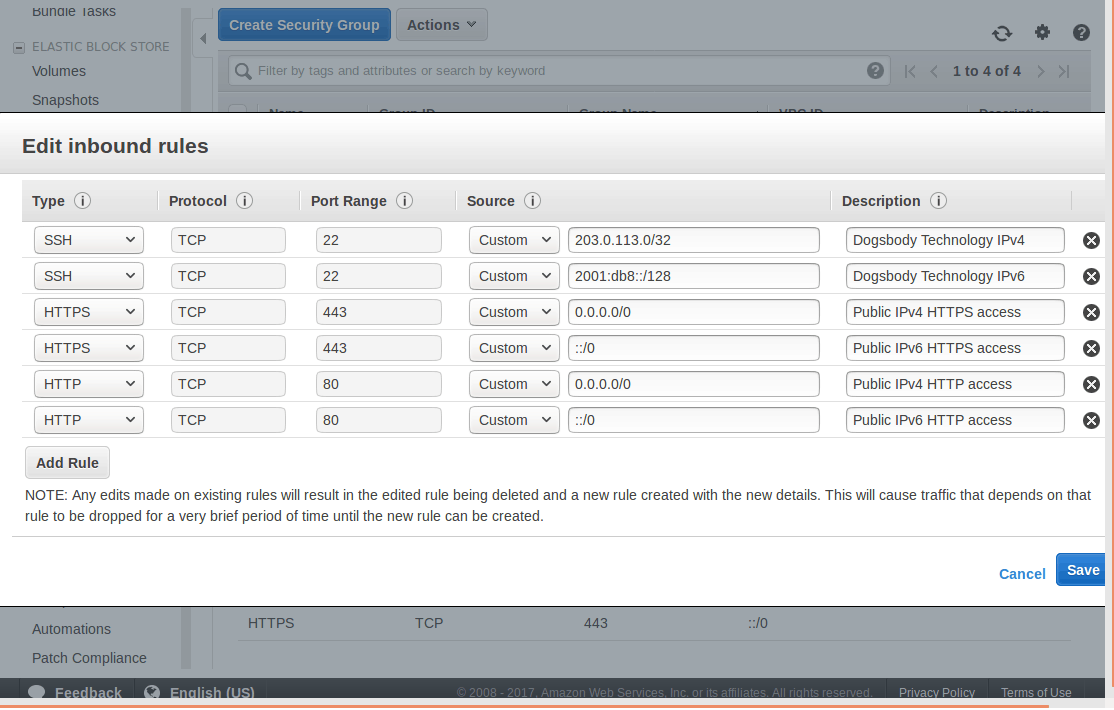
- Select the “Inbound” tab and “Edit” the rules
- There should be an IPv6 record mirroring your current IPv4 ones.
- Remember ::/0 is the IPv6 equivalent of 0.0.0.0/0.

- Now inbound IPv6 traffic is allowed into the server we need to allow traffic out.
- Select the “Outbound” tab and “Edit” the rules
- Create new IPv6 outbound rules just as you have IPv4.
- With most of our servers we have no reason to block outbound traffic, we can trust our server, so this is as simple as follows:
- Type, All traffic; Protocol, All; Port Range, 0 – 65535; Destination, ::/0; Description, Allow all IPv6 Traffic out.
Step 2: Assign the IP address
The final step in AWS is to assign your new IP address. This will be your new name in the IPv6 world.
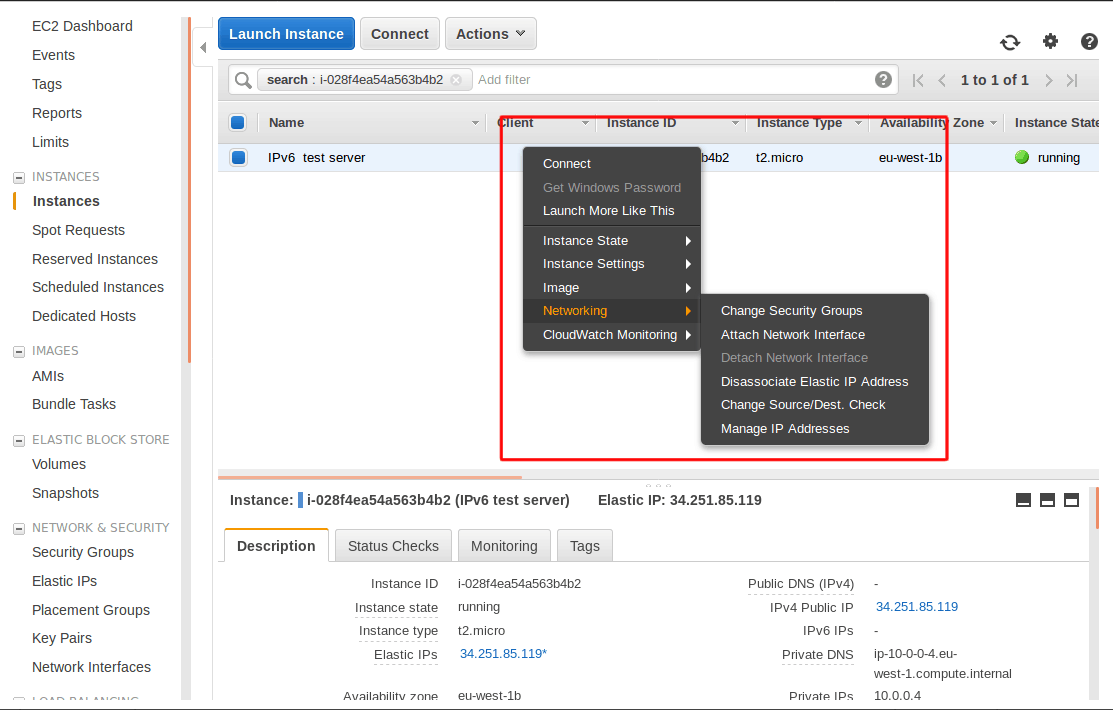
- Under the navigation bar select “Instances”
- Select your instance
- Right click and go to the “Networking” tab and select “Manage IP Addresses”
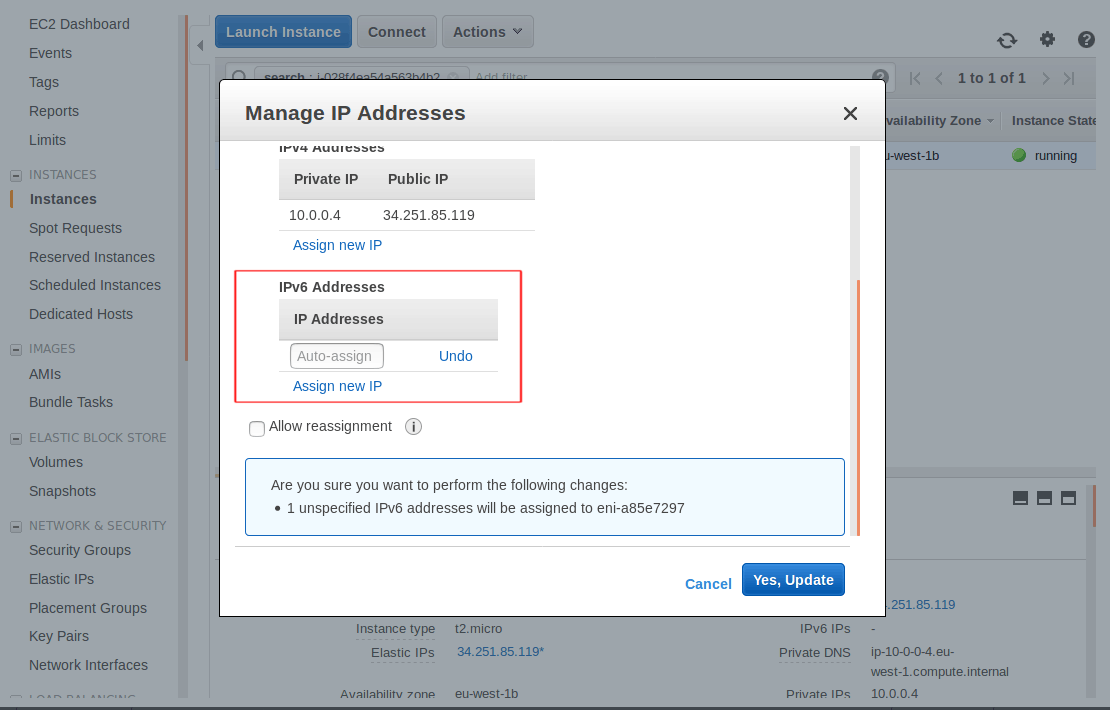
- Assign a new IPv6 address
Step 3: Listen in the Operating System
Each Operating System has a slightly different network set up and will need a different configuration.
If you are unsure what Operating System you are running you can find out by reading this file:
cat /etc/*-release
I use vim below but you can use nano if you prefer we don’t mind. 🙂
Ubuntu 16 clients
- Connect into the server on the command line over IPv4 as the admin user.
- Find your Network Interface name
- You can see all running network interfaces by running
ifconfig, in most situations there should be two interfaces.lois for local networking (where the traffic doesn’t leave the server) and there will be another which is what you are looking for. - You can also see your interfaces via the current configs:
cat /etc/network/interfaces.d/50-cloud-init.cfg - My interface is
eth0but it will depend on your instance type what interface name you have.
- You can see all running network interfaces by running
- Create a new configuration file for IPv6.
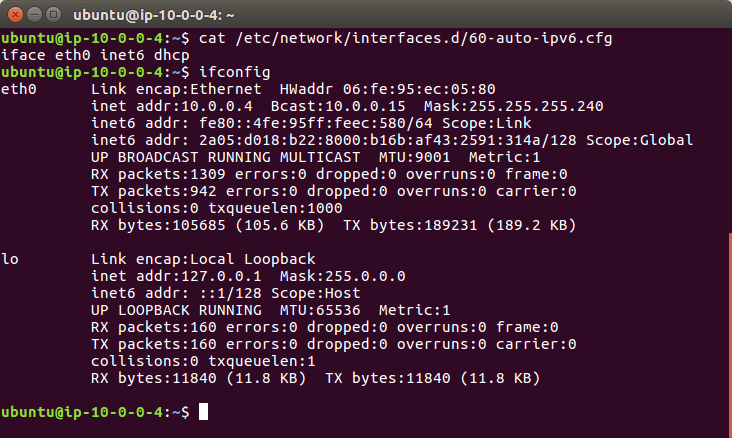
sudo vim /etc/network/interfaces.d/60-auto-ipv6.cfg- And add the following line to your file and save.
iface eth0 inet6 dhcp
- If you are interested in what this line does, it binds to the interface (for me eth0) using the inet6 (IPv6) address family and uses DHCP (Dynamic Host Configuration Protocol) to get the servers IP address.
- And last of all to load in this new config
sudo service networking restart- OR
sudo ifdown eth0 && sudo ifup eth0replacing “eth0” with your interface name.
Ubuntu 14 clients
You will need to reboot your Ubuntu 14 system to load in the new static IPv6 address.
- Connect into the server on the command line over IPv4 as the admin user.
- Find out your Network Interface name
- You can see all running network interfaces by running
ifconfig - My interface is
eth0but it will depend on your instance type what you have.
- You can see all running network interfaces by running
- Edit the existing network interface file.
vim /etc/network/interface.d/eth0.cfg- And make sure it contains the below lines
auto lo iface lo inet loopback auto eth0 iface eth0 inet dhcp up dhclient -6 $IFACE- If you are interested in what these lines do, lines 1 and 2 set up a local loopback interface this guides traffic from the server to itself which sounds strange but is used often in networking.
- Lines 3 and 4 starts networking on eth0 using DHCP (Dynamic Host Configuration Protocol) to get the servers IP address
- Finally line 6 starts dhclient which handles DHCP with the -6 flag to get the IPv6 address.
- Reboot the server.
sudo reboot
RedHat Enterprise Linux 7.4 and CentOS 7.4 clients
- Connect into the server on the command line over IPv4 as the admin user.
- On version 7.4 networking is managed by cloud-init. This is a standard tool for configuring cloud servers (like EC2 instances).
- Create a new config file in which we will enable ipv6 and add the below options.
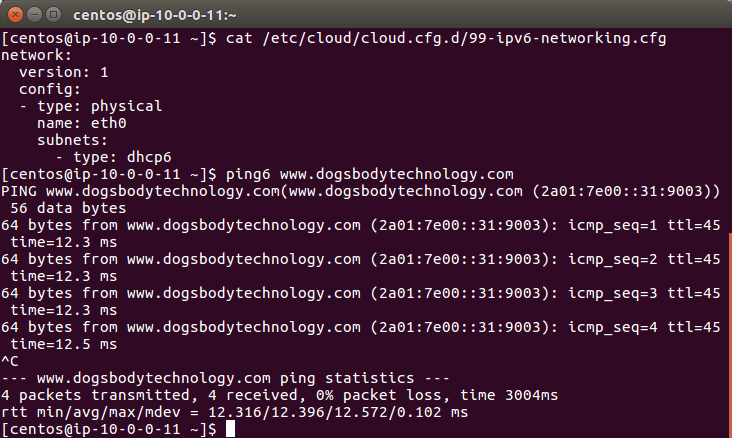
vim /etc/cloud/cloud.cfg.d/99-ipv6-networking.cfg
network:
        version: 1
        config:
        - type: physical
                name: eth0
                subnets:
                - type: dhcp6
RedHat Enterprise Linux 7.3 and CentOS 7.3 clients
- Connect into the server on the command line over IPv4 as the admin user.
- Edit the global network settings file
vim /etc/sysconfig/network- Update the following line to match this. This will enable IPv6 for your system.
NETWORKING_IPV6=yes
- Edit the existing network interface file.
vim /etc/sysconfig/network-scripts/ifcfg-eth0- Enable IPv6 for the interface
IPV6INIT=yes- Enable IPv6 DHCP so the server can automatically get its new IPv6 address
DHCPV6C=yes- Disable the Network Manager daemon so it doesn’t clash with AWS network services
NM_CONTROLLED=no
sudo service network restart
Step 4: Run like you have never run before
You are set up, the complex bit is done. Now we are at the application layer.
- Test that your IP address is set up by running:
ifconfig- You could see a line that starts “inet6 addr” and ends with “Scope: Global” this is your IPv6 address (which you can confirm by looking at the instance in the EC2 control panel).
- Test outbound connections work over IPv6:
ping6 www.dogsbodytechnology.com - We always use a server side firewall (along side the security groups) for the fine grain control it gives us on the server. It is essential that this firewall is updated to allow IPv6 connections.
- A very common tool for maintaining firewall rules is
iptables. This has an IPv6 equivalentip6tables.
- A very common tool for maintaining firewall rules is
- Configure your web/app server software to listen to IPv6
- Below are some example configuration lines so these common applications will start listening on IPv6.
- Apache
- Listen to IPv6 traffic on port 80 from the IP “2001:db8::”
Listen [2001:db8::]:80
- Listen to IPv6 traffic on port 80 from the IP “2001:db8::”
- NGINX
- To start listening to all incoming IPv6 traffic on port 80
listen [::]:80; - In fact there is a flag that disables IPv4 connections
ipv6only=on
- To start listening to all incoming IPv6 traffic on port 80
- To start using your domain name (example.com) you need to create “AAAA” records with your DNS provider. This DNS record type is specifically for IPv6 traffic so that they can find your server.
Conclusion
Well done for getting this far, I am glad we have both done our bit to bring IPv6 into this world.
If you have any questions please put them in the comments or contact us and we will be happy to get back to you 🙂
Feature image background by Eightonesix licensed Freepik.com & IPv6 Icon licensed CC BY 3.0.


Leave a Reply
Want to join the discussion?Feel free to contribute!